This page contains affiliate links, which means we may earn a small amount of money if a reader clicks through and makes a purchase. All our articles and reviews are written independently by the Netmums editorial team.
Smarties cake
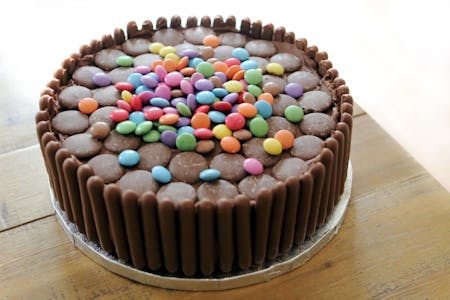
When it comes to a sweet surprise for kids, it's hard to beat a Smarties cake! Learn how to make this tasty treat - and even make a couple of variations on it along the way!
- Difficulty: Easy
- Serves 8+
- Freezable
Preparation
- Total time
- 45 Mins
- Preparation time
- 20 Mins
- Cooking time
- 25 Mins
For the cake
175g self-raising flour
50g cocoa powder
1 tsp baking powder
225g unsalted butter, softened
225g caster sugar
4 medium eggs
For the chocolate buttercream
500g icing sugar, sifted
80g cocoa powder, sifted
200g unsalted butter, softened
Pinch of salt
2 tbsp milk
To decorate
2 x 138g boxes Chocolate Fingers
1-2 large bags giant chocolate buttons
Smarties
For the cake
Preheat the oven to 180°C/160°C fan/Gas Mark 4. Grease and line two 20cm-round cake tins.
Sift the self-raising flour, cocoa and baking powder together in a large mixing bowl.
In a separate bowl, beat the butter and sugar together with a electric mixer for several minutes, until pale and fluffy.
Add the eggs to the butter and sugar mixture one at a time, continuing to beat as you go and alternating with a spoonful of the flour mixture. Fold in the rest of the flour mixture using a large metal spoon, until just combined.
Divide the flour mixture evenly between the two tins and smooth the tops. Bake for 20-25 minutes, or until the tops are golden brown and a cocktail stick inserted into the middles comes out clean.
Leave to cool in the tins for five minutes, before turning out onto a wire rack to cool completely.
For the chocolate buttercream
Add the icing sugar, cocoa powder, butter and pinch of salt to a large mixing bowl. Beat with an electric mixer for several minutes, until fluffy.
Beat in the milk, a little at a time, just until the icing is slightly loosened and a spreadable consistency (you may not need all the milk).
To decorate
When the cakes are completely cooled, spread half the buttercream on top of one of the sponges. Sandwich with the other sponge, then spread the chocolate buttercream over the top and sides.
Arrange the Chocolate Fingers around the sides of the cake.
Cover the top of the cake with chocolate buttons, followed by plenty of Smarties.
You will need
2 x 20cm round cake/sandwich tins - This one from MasterClass is conveniently non-stick and designed with a convenient loose base for easy release. Find it at Amazon.
Electric mixer - This one from Bosch is quiet, yet powerful and effortlessly whips cream and kneads dough to perfection. Get it at Amazon.
Tips
Room Temperature Ingredients
Before you start, ensure that your butter and eggs are at room temperature. Room temperature ingredients blend better, resulting in a smoother cake batter.
Smooth Buttercream
To achieve a silky-smooth chocolate buttercream, sift your icing sugar and cocoa powder before adding them to the mixture. This step helps prevent lumps and ensures a velvety texture.
Cake Levelling
If your cake layers have domed tops after baking, you can level them using a sharp serrated knife or a cake leveller. This step ensures even stacking and decorating.
Creative Decorating
Don't be afraid to let your creativity shine when decorating the cake. Experiment with different arrangements of Smarties, chocolate buttons, and other colourful candies for a unique look every time.
How do you get Smarties to stick to the cake?
Getting Smarties to stick to the cake is a breeze! After you've spread the chocolate buttercream on top and sides of the cake, gently press the Smarties onto the buttercream. The creamy texture of the buttercream acts as an adhesive, helping the Smarties stay in place. Feel free to arrange the Smarties in any creative pattern you like – mix and match colours, create a gradient effect, or go for a random arrangement for a playful look.
Do Smarties bleed on icing?
Smarties are designed to be candy-coated, which means they generally don't bleed or release their colours onto icing. However, if you're concerned about the colours mixing with the icing, you can take a precautionary step. Before decorating, you can place the Smarties on a paper towel for a few minutes to ensure that any excess moisture is absorbed, reducing the risk of colour transfer. This way, you can confidently create a visually stunning cake without worrying about colour bleeding.
How do you keep Smarties from Discoloring on a cake?
To prevent Smarties from discolouring on your cake, it's advisable to add them just before serving. Smarties are coated with a thin layer of candy shell, and while they are generally resistant to moisture, exposing them to high humidity or prolonged contact with the icing might lead to slight discoloration over time. By adding the Smarties right before serving, you ensure that they retain their vibrant colours and maintain the cake's visual appeal.
Variations
KitKat Delight
For a variation on the classic Chocolate Fingers decoration, swap them out for KitKats. The iconic wafer-filled chocolate bars add a delightful crunch to your cake's exterior.
- Choose your favourite variety of KitKats – milk chocolate, dark chocolate, or even flavoured options like mint or orange.
- To easily break the KitKats into finger-sized pieces, use a gentle sawing motion with a serrated knife. This prevents them from shattering into uneven pieces.
- For a neater appearance, align the KitKats evenly around the cake. You can use a ruler or a piece of string as a guide to ensure consistent spacing.
- To add an extra decorative element, tie a ribbon around the KitKats, securing them in place and giving the cake a charming finishing touch.
Smarties Surprise
Create a fun surprise by adding a layer of Smarties inside the cake. After pouring half of the batter into the cake tin, sprinkle a generous layer of Smarties, then cover with the remaining batter. As the cake bakes, the Smarties will create colourful pockets of sweetness.
- Prepare your cake batter as usual.
- After pouring half of the batter into the cake tin, gently sprinkle a layer of Smarties over the batter.
- Carefully pour the remaining batter over the Smarties, ensuring they are evenly covered.
- As the cake bakes, the Smarties will melt slightly, creating colourful pockets of gooey sweetness within the cake.
Seasonal Themes
Tailor the cake to match different occasions by using seasonal Smarties. Pastel shades for spring, red and green for Christmas, or even black and orange for Halloween – the possibilities are endless!
- Plan ahead and stock up on Smarties in various colours well before the occasion.
- Combine different shades of Smarties to achieve the desired seasonal look. For example, pastel Smarties for spring, red and green for Christmas, or warm tones for a cosy autumn cake.
- Consider incorporating other relevant decorations, such as edible flowers for spring, miniature candy canes for winter, or colourful leaves for an autumnal touch.
- To tie the theme together, use coloured icing or themed cake toppers that complement the chosen Smarties colours.
Reviews
Poppy Y
★★★★★ Rated 5 out of 5 stars.A classic! Easy recipe and the chocolate fingers and Smarties hide any imperfections.
Reviewed on 08/10/20
